If there is one thing that everyone knows about pool game, it is that it is interesting and thrilling to play. It does not matter if you are young or old, everyone enjoys playing a game of pool. And if you want to be the coolest amongst your friends, you should master it.
As an amateur or a beginner in the game, you can end up being poor at making consistent accurate shots. Now, do not feel bad like it is all your fault.
The truth is that, no one tried teaching you how to hold a pool stick correctly. For those unaware, holding the pool cue correctly is a basic and the most crucial step needed in playing pool.
If I am being honest with you, you will never be a good player if you do not understand how to hold a pool stick. While you think of it as a simple and useless thing to learn, the fact remains that it is not.
There are techniques and rules involved in mastering it and this is why we have compiled this article. I will be teaching you the steps involved in holding the pool cue correctly to get specific shots.
Understanding The Different Types Of Bridging
Before we delve into how to hold a pool stick, it is important you have a good understanding of the bridge techniques. For beginners, you need to know Billiards Shooting Tips .There are lots of bridge techniques you can carry out with your fingers, be it your pinkie finger or index finger . They include:
• The Open Bridge
One thing to have in mind about the open bridge technique is that it is the most popular. The reason for this is not farfetched as it is the easiest technique to apply when you compare it to other techniques.
When I make use of the open bridge technique, I first of all position my submissive hand on the pool table’s surface when I lean forward, and I keep my fingers apart from each other. After taking this position, I simply use my dominant hand to clutch the other end of my pool cue.
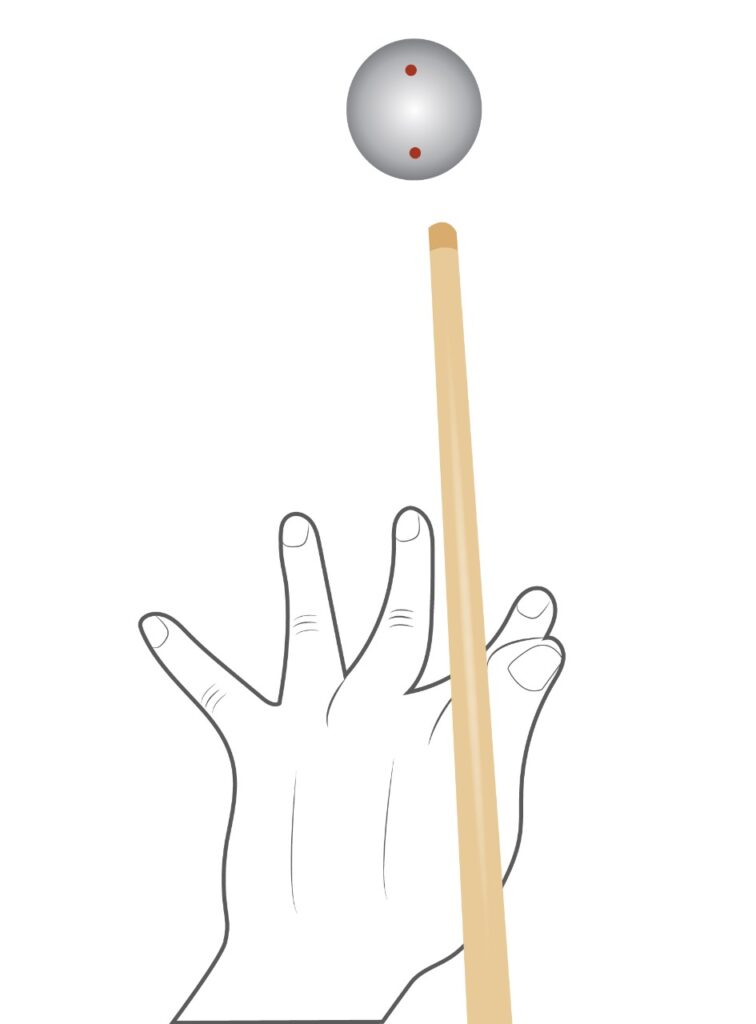
Read carefully, because as I assume the position above, I normally place the pool cue between my thumb and index finger. Slowly, I raise up my thumb and embark on bridging the cue’s tip with only my index finger.
As for my middle finger, it is definitely not compulsory to use it along with my index finger even if I need to adjust my loose grip. Just as I have explained, you can try this step when next you want to use the open bridge method.
• The Closed Bridge
The closed bridge technique is used by experts as it helps them enhance the precision of their shot accuracy. To use the closed bridge technique, I simply make a closed fist then place my non dominant hand on top the pool table.
You have to read carefully so as not to miss any step. Once I close my fist, I make the next move which is to widen my hand by opening my ring finger, small and middle finger. In this position, one must not include their index finger.
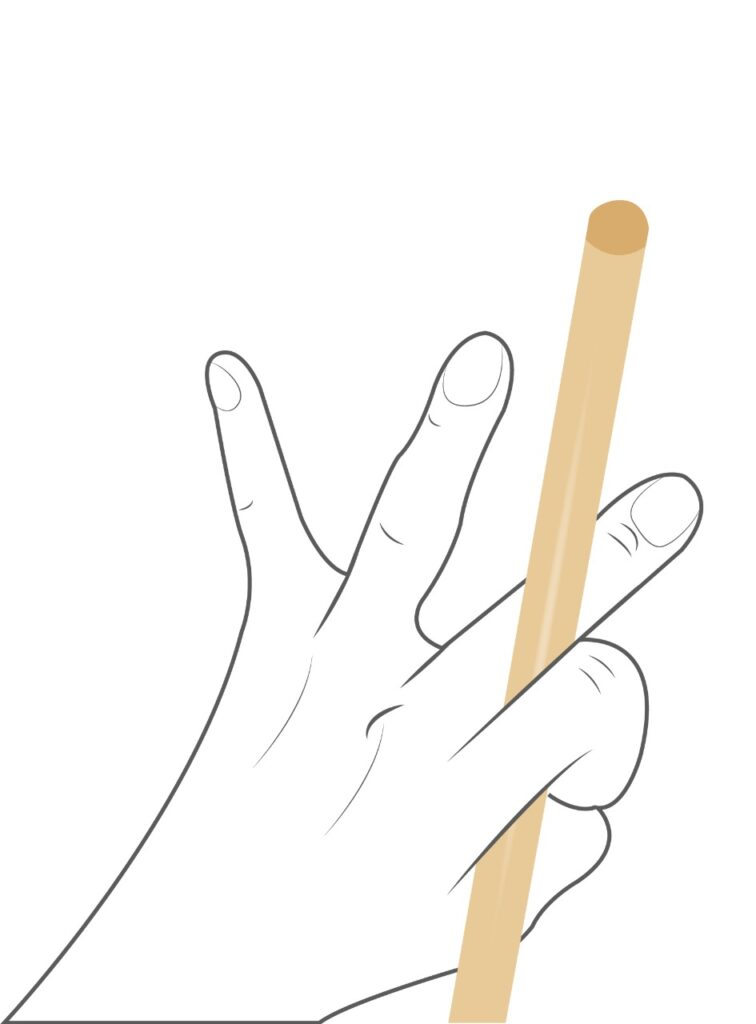
With all this done, I position my thumb underneath my closed index finger. I further enclose it by creating a circle with my index finger by positioning it over my thumb.
Once this is done, I have to bend my fist circle which I made by my index finger and my thumb. I embark on this by placing the pool cue within and carry out lots of back and forth movements in a bid to release it properly and make certain shots.
Now you have an idea on how to make use of the closed bridge method with your bridging hand.
• The Rail Bridge
In learning how to hold a pool stick, it is important you learn bridging techniques like the rail bridge technique. The rail bridge is used when the pool ball is near the rail and your one hand does not have enough room for an entire shot.
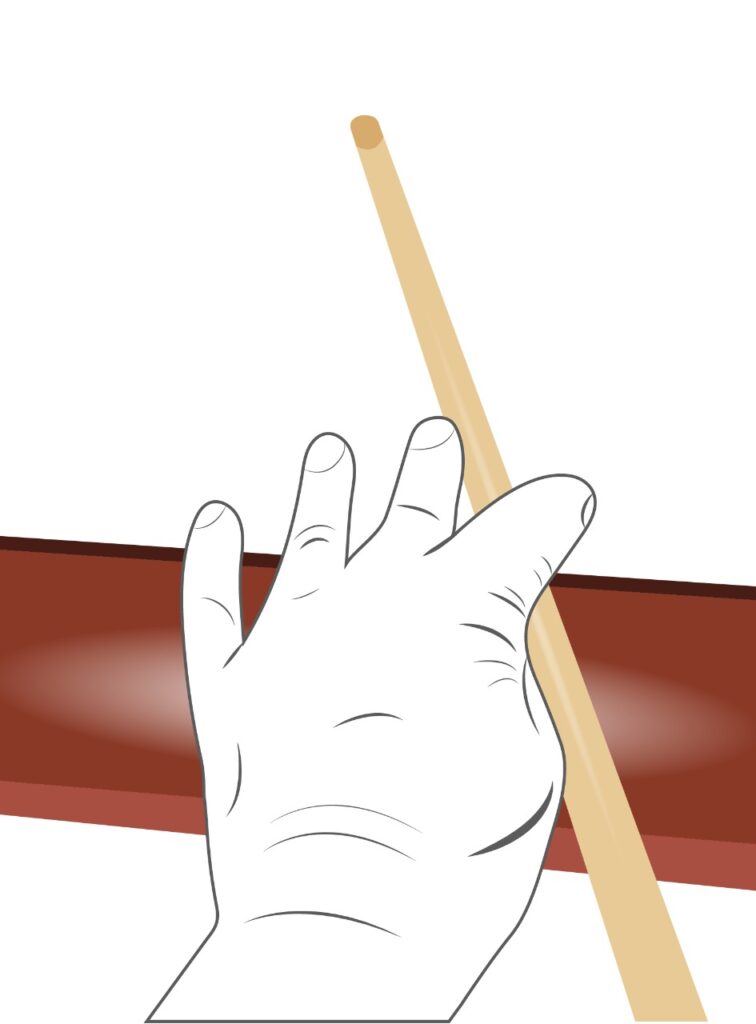
As a simple technique, I will show you the steps I use with this technique. First of all, I place my non dominant hand slowly on top the rail. Then, I make the typical open bridge shot.
This shot is made when I position my pool cue between my index finger and my thumb subtly , then I place my index finger above my cue in a manner that the cue ends up between my index finger and middle finger perfectly.
Once this is done, the next thing I do is to adjust my firm balance, bend my legs a little bit and take a precise shot by simply aiming at the center of the cue ball. Like I stated earlier, the rail bridge technique is quite simple.
• Mechanical bridge
The mechanical bridge is used when your target ball is far from you and will not be reachable even if you make use of open bridging. It is also used when you are shooting pool on a bigger and wider pool table.
Another reason to use this method is when your object ball is placed ahead of your cue ball. And as you keep trying to hit those target balls, your bridge becomes shaky and unstable.
As a pool player, the step I use in carrying out the mechanical bridge is by placing the bridging cue laying flat on the surface of the table the correct way. Then, I position the bridging cue in a way that the bridge top is estimated to be roughly six to eight inches away from the cue ball.
As I do this, I make sure I am a bit close to the cue ball, but I also remember to keep a good distance in order for a smooth shot with better control to go through. As for the bridge cue, I make use of a proper grip to gold it confidently with my other unused hand.
While following these steps like I do, ensure that the bridge cue is on the left to the shooting cue especially as a right handed player. Furthermore, I embark on moving my shooting cue and placing the cue shaft in any of the marks on top the bridge head.
When that is done, I position the cue in the lowest mark as it is ideal for when one tries to draw or need to stop the cue ball. Bear in mind that though I position the cue in a high notch, it is only suitable for those who need the cue ball on a following path.
More so, if you have lots of object balls, there will be some extra elevation as you will need to place the bridge top on the side surface and use a side mark. Once all these are sorted out, I normally clutch my pool cue at the end of the cue.
In doing this, my thumb is placed below the bottom of the playing cue in a comfortable position while the remaining four fingers are positioned all around the crown. As for my shooting elbow, it is fixated on my side.
An important fact I have to let you in on is that, I use my fingers and wrist for stroking my cue and not my elbow. More so, there will be no need to touch another object ball or the cue ball while you play pool.
And as you play, it is vital to make conscious shots with more precision and even hit the ball. Finally, this is all you need to know to carry out the mechanical technique.
Tips: How To Hold A Pool Stick
Now that you understand the bridge techniques you can use as you play pool, it is time to learn the basics on how to hold a pool stick. The tips you need to learn include:
1. Make use of your comfortable bridge hand then grasp the cue
A proper way to hold a pool stick is to cautiously grasp the cue stick at your waist level using the hand position you are comfortable with. Like I normally do, I use my dominant hand to grab the rear end of the pool stick.
And if I need to check if my dominant hand is on the ideal place, I usually check for tape at the rear. Then, subtly yet slowly, I move my hand placement behind the tape. To know if this is done correctly, you should have a difference of roughly four or five inches from this tape.
Then, I make sure my right hand creates a ninety degree angle with the cue stick to know if I am holding the cue stick in the proper way. Have it in mind that, lots of people that began playing pool make use of a tight grip.
This should not be the case as it is a wrong way to hold the pool stick. The proper grip is a loose grip that is precise. When you have gotten the correct holding format, you are to cradle the tip of your cue stick with your hand.
I usually place the cue tip between my index finger and thumb. However, you can use your middle finger if you need to hold it in a relaxed grip.
Understand that, this sort of cradling is known as the open bridge since it is the most common.
Moving further, I ensure that my body and the cue ball are in one direct line as this will help with making proper shots. It is advisable to hold on to the other end of your cue stick with your non dominant when learning how to hold a pool stick.
2. Your Upper body should be dropped to the pool table
In learning how to hold a pool stick, the next step is to take a good look at the pool table then start imagining your shot by having a precise focus. One way I easily get this done is by dropping my upper body down towards the pool table.
As I drop my upper body on the table, I hold the cue stick on my right hand and grip the other end of my cue stick with my palm. However, I do not bridge the cue tip with my other hand just yet.
This is because any tiny slip can go right ahead to hit the cue ball. When doing this, ensure that you do not blink and try your best in staying motionless. More so, I ensure my legs are not straight but bent in a way.
3. Bridging or cradling the tip of the cue using the other hand
The most vital part of knowing how to hold a pool stick is holding your cue properly to make a good shot. At this point, I normally open my palm and place it down on the surface of table just behind my cue ball.
One general rule I must let you know is that your other hand must be placed a minimum of six to eight inches behind your cue ball. I do ensure I spread my fingers widely when I place my palm on the table.
While my palm is open on the table, I slide the cue stick subtly between my index finger and thumb. Ensure you do not do this hurriedly as it can damage or burn your skin. More so, I ensure the open bridge I make with my thumb, index and middle finger are stable.
If the fingers happen to be displaced pretty easily or tremble, you can swiftly lose any shot. This means that all your ring fingers, index fingers and even the pinky finger must be in place when practicing how to hold a pool stick.
4. Gripping the cue firmly and concentrating on your target
As your posture is kept firm and balanced, you are to concentrate on the object you aim on hitting. Then, focus on your cue ball using the cue. Like I stated earlier in the article, embark on imagining the shot you want to play to hit your object ball with your cue ball.
When I play, I always have it in mind that hitting the ball will not be enough, so i ensure I hit the center of my cue ball for highly extreme precision. The result from doing this is that, it heightens my chances of immensely hitting my object ball.
When you want to embark on this mission, ensure you are comfortable and note that your cue stick will have to be aligned with the cue ball so that the object balls in your path can be seen clearly.
5. Balancing of your cue to make the shot
When I am done constructing my shot, I usually slide my cue forward and backward to get the ideal feel before making my final shot. However, when I do feel that something is not right, I embark on readjusting my shot.
Note that, when you readjust, you are to stay firm while keeping your balance. Then, move the cue forward and backward some more to ensure you will do nothing but hit the cue ball right at its center.
Bear in mind that you are not shooting pool in different directions, so your planned shot must be followed through severally and only hit the cue ball when your body is firm, the bridge is accurate and the shot will go where you want it to.
When I am done reaffirming, I immediately take my shot by moving my cue back and forward with enough force. Though the force I use is dependent on the kind of shot on my mind to play.
One tip to let you in on is that, when I am done taking my shot, I keep my body low in that same position for some seconds. You can try it out as it helps in creating the original shot position with time.
When playing this game, ensure that the bridge you male is comfortable for your cue to subtly slide between your thumb and forefinger. Note that if your bridge is tight, the cue will connect with your skin easily and even change the shot.
Conclusion
Now that you have different ideas on how to hold a pool stick when playing the game, it is time to take your practice to a whole new level. However, bear in mind that I have shared my experience with you and you can follow the steps to play a better game.
Do not forget that, in the game of pool, the major parts of your hands used are your upper arm, pinky finger, middle finger, ring finger, index finger and your thumb. If you want to use a pool glove to play, then that is alright as well.
Hey, you used to write fantastic, but the last few posts have been kinda boringK I miss your super writings. Past several posts are just a bit out of track! come on!
Thanks for the auspicious writeup. It if truth be told used to be a leisure account it. Glance complex to more delivered agreeable from you! By the way, how can we communicate?
Hi, I think your site might be having browser compatibility issues. When I look at your website in Safari, it looks fine but when opening in Internet Explorer, it has some overlapping. I just wanted to give you a quick heads up! Other then that, fantastic blog!
Have you ever considered about including a little bit more than just your articles? I mean, what you say is important and everything. Nevertheless think of if you added some great pictures or videos to give your posts more, “pop”! Your content is excellent but with pics and clips, this site could certainly be one of the very best in its field. Excellent blog!
Hiya, I’m really glad I have found this info. Nowadays bloggers publish only about gossips and net and this is really frustrating. A good website with exciting content, this is what I need. Thanks for keeping this web site, I will be visiting it. Do you do newsletters? Can’t find it.
hello there and thank you for your information – I have certainly picked up something new from right here. I did however expertise some technical issues using this site, since I experienced to reload the web site many times previous to I could get it to load correctly. I had been wondering if your web hosting is OK? Not that I’m complaining, but sluggish loading instances times will very frequently affect your placement in google and could damage your high-quality score if advertising and marketing with Adwords. Well I am adding this RSS to my email and could look out for much more of your respective exciting content. Ensure that you update this again soon..
A powerful share, I just given this onto a colleague who was doing a bit evaluation on this. And he in actual fact bought me breakfast as a result of I found it for him.. smile. So let me reword that: Thnx for the treat! However yeah Thnkx for spending the time to debate this, I feel strongly about it and love studying extra on this topic. If potential, as you turn out to be experience, would you thoughts updating your weblog with more particulars? It is extremely useful for me. Massive thumb up for this weblog publish!
I’ve been exploring for a little for any high-quality articles or blog posts on this kind of space . Exploring in Yahoo I at last stumbled upon this site. Studying this info So i’m happy to express that I have an incredibly good uncanny feeling I discovered just what I needed. I such a lot certainly will make sure to do not omit this website and give it a look regularly.
Unquestionably believe that that you stated. Your favourite reason seemed to be at the net the easiest factor to keep in mind of. I say to you, I certainly get irked whilst people consider worries that they plainly do not recognise about. You controlled to hit the nail upon the highest and outlined out the entire thing without having side-effects , people can take a signal. Will probably be back to get more. Thank you
Thank you for sharing with us, I think this website truly stands out : D.
Good write-up, I’m normal visitor of one’s blog, maintain up the excellent operate, and It’s going to be a regular visitor for a long time.
I just couldn’t go away your web site prior to suggesting that I really loved the usual information an individual supply on your visitors? Is going to be back steadily in order to check up on new posts
You could certainly see your expertise within the work you write. The world hopes for more passionate writers like you who aren’t afraid to say how they believe. Always follow your heart. “What power has law where only money rules.” by Gaius Petronius.
I¦ve recently started a website, the information you provide on this website has helped me tremendously. Thanks for all of your time & work.
I loved as much as you’ll receive carried out right here. The sketch is tasteful, your authored subject matter stylish. nonetheless, you command get bought an shakiness over that you wish be delivering the following. unwell unquestionably come further formerly again as exactly the same nearly a lot often inside case you shield this increase.
Real nice layout and fantastic content material, practically nothing else we require : D.
Hey! I just wanted to ask if you ever have any issues with hackers? My last blog (wordpress) was hacked and I ended up losing months of hard work due to no back up. Do you have any solutions to protect against hackers?
naturally like your web-site however you have to check the spelling on quite a few of your posts. A number of them are rife with spelling problems and I in finding it very bothersome to tell the reality nevertheless I’ll surely come back again.
Hi, Neat post. There’s a problem with your website in internet explorer, would check this… IE still is the market leader and a good portion of people will miss your excellent writing due to this problem.
You have mentioned very interesting points! ps decent website . “We make ourselves a ladder out of our vices if we trample the vices themselves underfoot.” by Saint Augustine.
I like what you guys are up also. Such clever work and reporting! Keep up the excellent works guys I have incorporated you guys to my blogroll. I think it will improve the value of my web site :).
Wow! Thank you! I permanently wanted to write on my site something like that. Can I include a part of your post to my blog?
Thank you for sharing excellent informations. Your website is very cool. I am impressed by the details that you have on this website. It reveals how nicely you understand this subject. Bookmarked this web page, will come back for more articles. You, my pal, ROCK! I found just the information I already searched all over the place and just could not come across. What a great web-site.
Undeniably believe that which you said. Your favorite justification appeared to be on the web the simplest thing to be aware of. I say to you, I definitely get annoyed while people think about worries that they plainly don’t know about. You managed to hit the nail upon the top and defined out the whole thing without having side-effects , people can take a signal. Will likely be back to get more. Thanks
I cherished up to you will obtain carried out proper here. The cartoon is tasteful, your authored subject matter stylish. however, you command get bought an shakiness over that you would like be turning in the following. unwell unquestionably come further until now once more as exactly the similar just about very regularly inside of case you shield this increase.
I like this blog so much, saved to favorites.
Everything is very open and very clear explanation of issues. was truly information. Your website is very useful. Thanks for sharing.
But wanna remark on few general things, The website design is perfect, the written content is real superb : D.
You have brought up a very superb details , thankyou for the post.
You are my inhalation, I possess few web logs and infrequently run out from to brand : (.
You are my inhalation, I own few blogs and sometimes run out from to brand.
I found this article to be very eye-opening. Thanks for sharing.
I gotta bookmark this web site it seems handy very beneficial
so much great information on here, : D.
Very good blog you have here but I was wondering if you knew of any discussion boards that cover the same topics discussed in this article? I’d really love to be a part of online community where I can get advice from other experienced people that share the same interest. If you have any recommendations, please let me know. Many thanks!
Hello.This article was extremely interesting, especially since I was looking for thoughts on this subject last couple of days.
Everything is very open and very clear explanation of issues. was truly information. Your website is very useful. Thanks for sharing.
Wow, amazing blog layout! How long have you been blogging for? you make blogging look easy. The overall look of your web site is excellent, as well as the content!
You can definitely see your enthusiasm within the work you write. The arena hopes for even more passionate writers such as you who are not afraid to say how they believe. All the time follow your heart. “Every man serves a useful purpose A miser, for example, makes a wonderful ancestor.” by Laurence J. Peter.
My brother suggested I might like this web site. He was once entirely right. This submit actually made my day. You cann’t imagine just how a lot time I had spent for this info! Thank you!